DAPTicket Installation
- Make sure you are using DAP v4.3 or above, because DAP Ticket won’t work otherwise.
- Download the dapticket_v1.0.zip file from the member’s area here on WickedCoolPlugins.com.
- Unzip the files inside to your desktop. You will find a folder called “support” and 2 files under it:
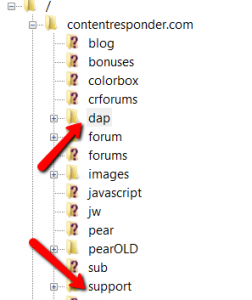
- support (folder) – upload the entire support folder (with the files under it) to the root folder of your website (just like dap). If you have installed it right, you will be able to access http://YOURSITE.com/support… just like you install dap to the root of your site and then access http://YOURSITE.com/dap. You should end up with both support folder and dapfolder under the root folder of your website as shown below.

- dap_supportrules.php – upload this script to the /dap folder on your site.
- supportAdmin.php – upload this script to /dap/admin folder on your site.
4. Once all of the above steps are complete, you can complete the installation and basic setup in a web browser.
You can invoke the installer by simply browsing the Ticket URL e.g http://www.YourSite.com/support. Alternatively you can enter the full URL into your browser address bar e.g http://www.YourSite.com/support/setup/.
Note: Replace YourSite.com above with the name of your website.
5. If you do not know the MYSQL database details, you can check your wordpress config file – wp-config.php to find out what it is.
You can leave the table_prefix as the default ost_.
6. Go to Support Ticket Admin Panel:
http://YourSite.com/support/scp/admin.php (replace YourSite.com with the name of your site)
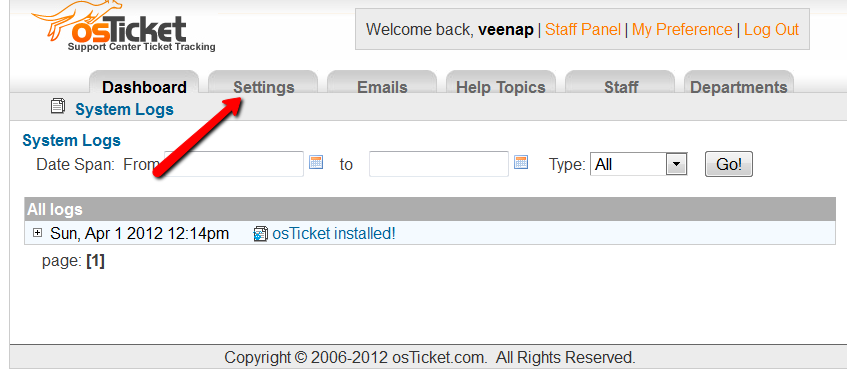
7. Click on Settings Tab.
8. Change Helpdesk Status to Online (active).
9. Save changes.
Set Up Rules For DAP Integration
Visit this page in your DAP admin dashboard to setup the DAP-to-DAPTicket Integration Rules to make sure only valid/allowed user are able to access your support ticket system.
http://YourSite.com/dap/admin/support.php (Replace YourSite.com with the name of your site)
Define “DAPTicket: Global Redirect URL for Support” in your DAP Admin -> Setup->Config. When users with no support capable products, try to access the support page, they will be redirected to whatever you set under the Global Redirect URL for Support in dap setup->config
Or users that have access to multiple expired support capable products will also be redirected to this Global Redirect URL to get access to support.
Lets say there are 4 products – A, B, C, D
Say the admin has defined rules that says.. anyone that has access to products A or B, gets access to support.
Here’s how support access will work:
A user that has access to A or B or both A&B will have access to support.
A user with expired access to A, but valid access to B or vice-versa will have access to support.
A user with expired access to A and expired access to B will NOT have access to tickets even if they have valid access to C and / or D.
A user with expired access to A and expired access to B when they go to access ticket system, will get redirected to the GLOBAL redirect URL (you can set up the global redirect url in dap setup -> config).
A user with expired access to A and NO access to B will get redirected to the A’s expired access url
A user with EXPIRED access to only 1 support capable product .. will always get redirected to that product’s redirect url.. set in the support rules setting page by admin
A user with EXPIRED access to more than 1 support capable product .. will always get redirected GLOBAL redirect url (need to define in setup -> config)
A user with access to NO support capable products . will always get redirected GLOBAL redirect url (need to define in setup -> config)
Testing User Experience
1) Logout of DAP (visit http://YourSite.com/dap/logout.php or click on the dap logout button on your site)
2) Now visit the support page – http://YourSite.com/support
3) You should get redirected to DAP login page. This is so only valid dap users can login and use support ticket system.
4) Now login to dap using the test user’s dap email id/password
5) Now see if you get redirected to the support page and test user’s email id is pre-populated
6) Click on an open ticket, see if your email id is pre-populated.
7) Also test out the various scenarios described above related to support access for users that dont have access to support capable products or with expired access to support capable products.

