SmartPayCart (SPC) Integration with Authorize.net
If you have an authorize.net merchant account, then please read this document on how to setup the SmartPayCart (SPC) integration with Authorize.net:
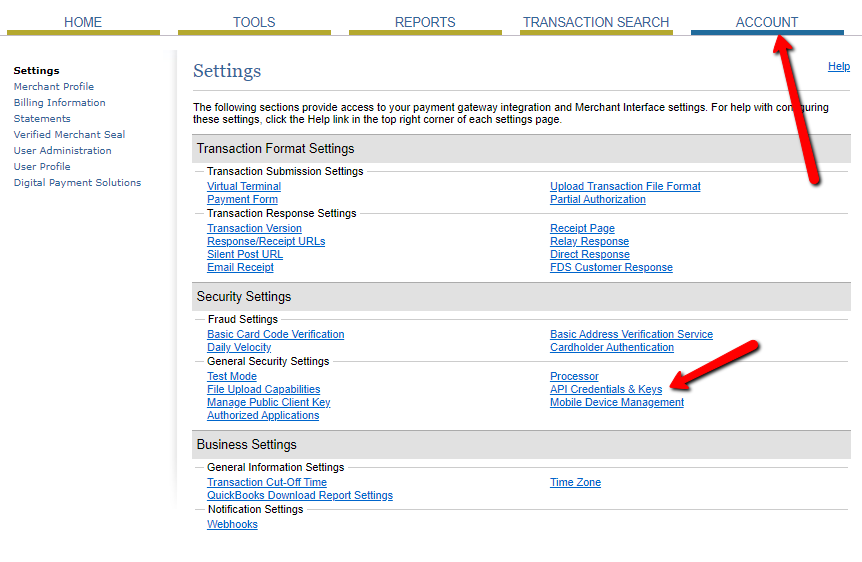
Step 1) Login to your Authorize.net account. Click on ACCOUNT.
Step 2) Click on API Credentials and Transaction Key. Make a note of the API Login Id and Transaction Key.
Step 3) Click on Silent Post URL in the Authnet Account >> Settings page.
The Silent Post setting is required by SPC/DAP to process successful and failed recurring payment notifications from Authorize.net. This allows SPC/DAP to automatically extend user’s access to your recurring product upon successful subscription payment and notify users if payment fails with the reason for failed payment and action they need to take.
Step 4) Set the Silent Post URL in your authorize.net account to:
https://YOURSITE.com/dap/dap-silentpost.php?secretKey=ENTERKEY
Replace yoursite.com above with the actual name of your site. Replace ENTERKEY with any secret key value. It can be any alphanumeric string you want. Just make sure to enter the EXACT same secret key string in DAP setup >> config page >> Secret Key field.
Step 5) Login to your DAP Admin Dashboard -> go to Setup -> Config -> Payment Processing – Authorize.net section. And enter the Authnet API key and login Id that you got from Authorize.net above (step #2) in these fields:
API Login ID (get by logging in to your Authorize.net account)
Transaction Key (get by logging in to your Authorize.net account)
Step 6) Visit WP Admin >> SmartPayCart >> Settings page.
Enter your authorize.net API ID and Transaction Key in the Live Mode tab.
Step 7) Now you can create products in DAP. Create checkout page in SPC and enable credit card payment. And create payment buttons in SPC to sell your products.
Click on the button to watch video on how to start selling your products using SPC:
© 2019, Wicked Cool Plugins Inc . All rights reserved.


